Saturday, November 24, 2012

Sweet 16


My daughter's Sweet 16 was on Saturday April 28th 2012. After trying to figure out the perfect location for her party, we finally decided to have it on a boat. This was the boat, The Destiny, and it's part of World Yacht.
I thought since the party was going to be on a boat it would be cute to make message in a bottle invitations. Immediately I knew I wanted to have a caricature drawing of my daughter in her dress, standing on top of the boat, with Maggie's Sweet 16 and the date of the party on a life preserver on the side of the boat. Of course I also wanted the NYC skyline in the background. I found a caricature artist online and this is what he came up. My daughter and I loved it. This was the front of the invitation... 
and this was the back of the invitation...
Here are some of the materials for the message in a bottle invitation
The best price I found for the bottles was online, http://www.bottlemeamessage.com/ and they were great to deal with. First I filled the bottles with sand and shells, and then I rolled up the invitations and tied them with a piece of twine that was long enough to stick out of the top of the bottle so all you had to do was pull the twine and the invitation would come out of the bottle. We used glass bottles for the invitations that were handed out, and plastic bottles for the invitations that were mailed out.
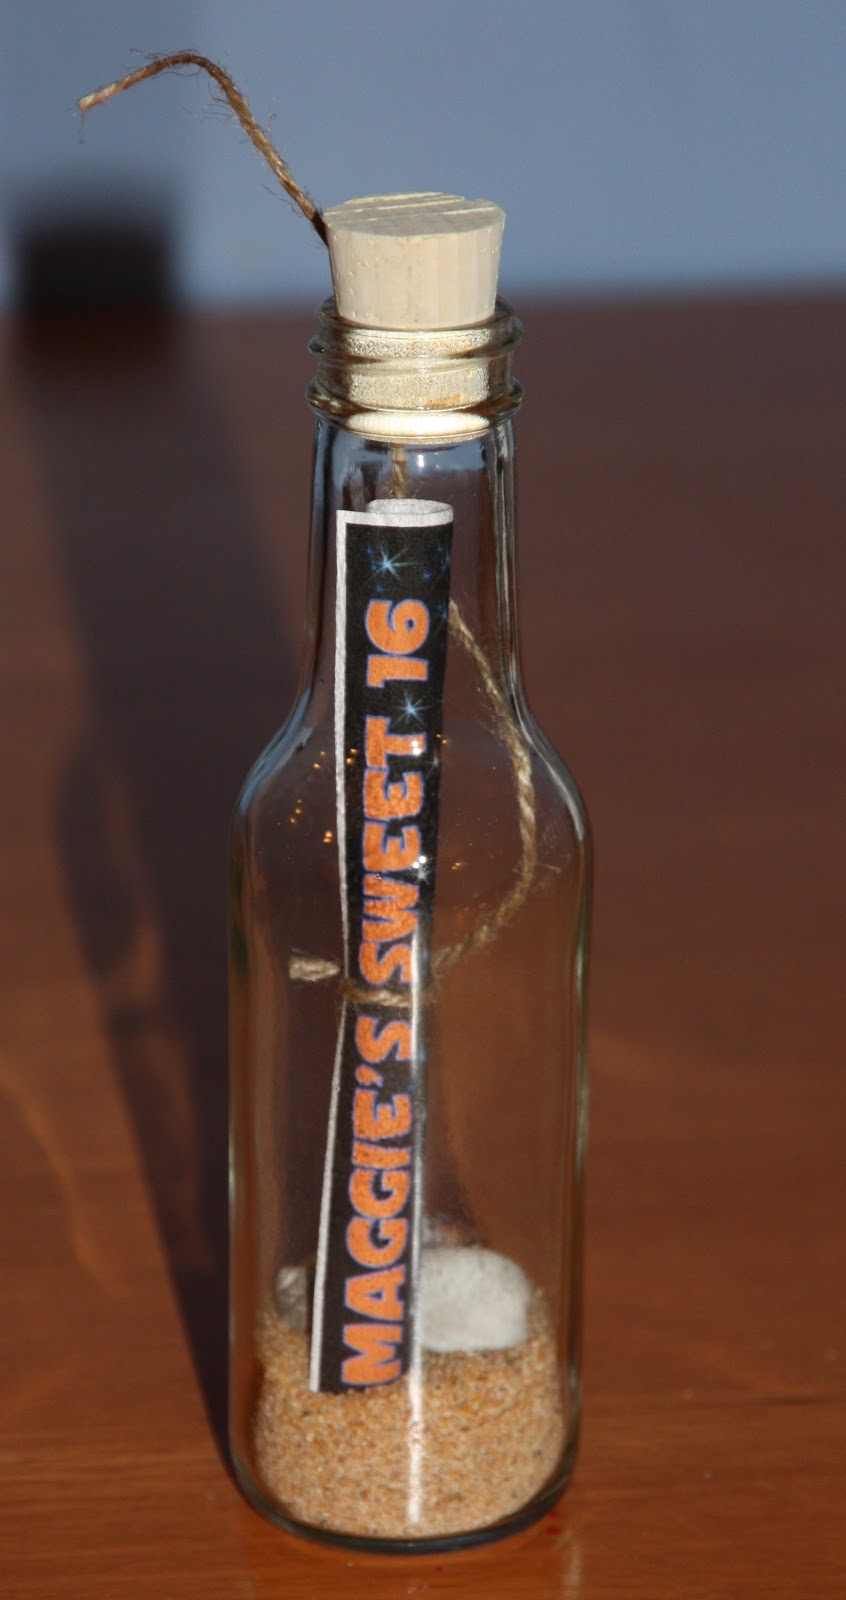
 To finish off the invitation I wrapped the mouth of the bottle with raffia, and for the name tags I printed the names on ivory card stock and distressed the edges so they would look worn. I added little silver anchor charms that I bought on eBay. This is a close up of the top of the bottle.   
This is what the completed message in a bottle invitations looked like.
We used the same drawing from the invitations for a signboard.
There were so many colors to choose from because my daughters dress was so colorful, but she chose orange and hot pink and some silver too. A friend of mine since childhood made the table runners. We alternated one table orange, one table pink.
This was my daughters table.
I bought the fabric for the table runners at Joanns. I also bought the square silver containers for the flower arrangements from Joanns. I made the flower arrangements using orange and hot pink roses. All the tables had one flower arrangement on them, except for my daughters table, her table had two flower arrangements. This is a close up of one of the flower arrangements.
For the place cards my daughter and I thought it would be cute to make paper boats. We made the boats out of really beautiful silver paper that I bought online. I printed the guests names on the sails of the boat, and attached the sails to skewers.  
My daughter picked these glittery shoes by Ivanka Trump but she wanted bling on her shoes as well. This is what her shoes looked like pre-bling.


This is what her shoes looked like after blinging out the heels.


The boat had three levels. We set the lower level up like a lounge. That is where the DJ and dance floor was. There were couches and round tables. I didn't want to do floral centerpieces on the lower level as well so I decided to make 10 luminaries for the round tables. I used 5x7 black mat frames that my boss graciously donated. I taped four frames together with black electrical tape to make 1 luminary. Each luminary had different pictures of my daughter, through the years, and Maggie's Sweet 16 printed on vellum. 


I bought battery operated votive candles that changed 7 different colors. It's really hard to see in the pictures but they looked very nice once the lights were dimmed.

We also had a step and repeat downstairs for all the guests to have their picture taken in front of when they first boarded the boat. Our photographer provided the backdrop for us, but my daughter and I designed it. For the large Maggie's Sweet 16 in the center of the backdrop I used the same font that I used on the luminaries.
This my daughter in front of the backdrop.
I found a website http://www.marlyssandstacey.com/ that creates the most amazing card/giftcard boxes. I worked closely with Marlyss to design a card box that my daughter would love.
We had a caricature artist at the party. To save time there were 11x17 pieces of paper that were designed and printed ahead of time. The theme of the pre-printed paper was similar to the drawing on the invitation. My boss also donated beautiful mat board frames for the caricatures, and I found clear bags on eBay to put the frames in that fit perfectly. These were the souvenirs. This is my mom and daughter getting their caricature drawn together.
You can't have a party without a cake. My search for a beautiful cake at a reasonable price was a long one. The fact that the party was in Manhattan instantly meant a price markup of more then 100%. My daughter had found a picture online of a cake she liked so we set out to find a place to make it at a reasonable price. We were looking for a smaller, 3 tiered version of this cake.
When I just about lost all hope of finding an affordable cake, Heather Collis the sales manager from World Yacht recommended Julissa from http://www.mostlycupcakesny.com/. She was great to work with from the first email. This is what Julissa made for us.

My daughter cutting her cake.
The cake was beautiful and colorful inside and out, and it was delicious. The cake tasted like marzipan, which is something my daughter and I love. We saved the top tier of the cake, and took it home. This is what a slice from the top tier looked like.  
This is my favorite picture from the entire night.
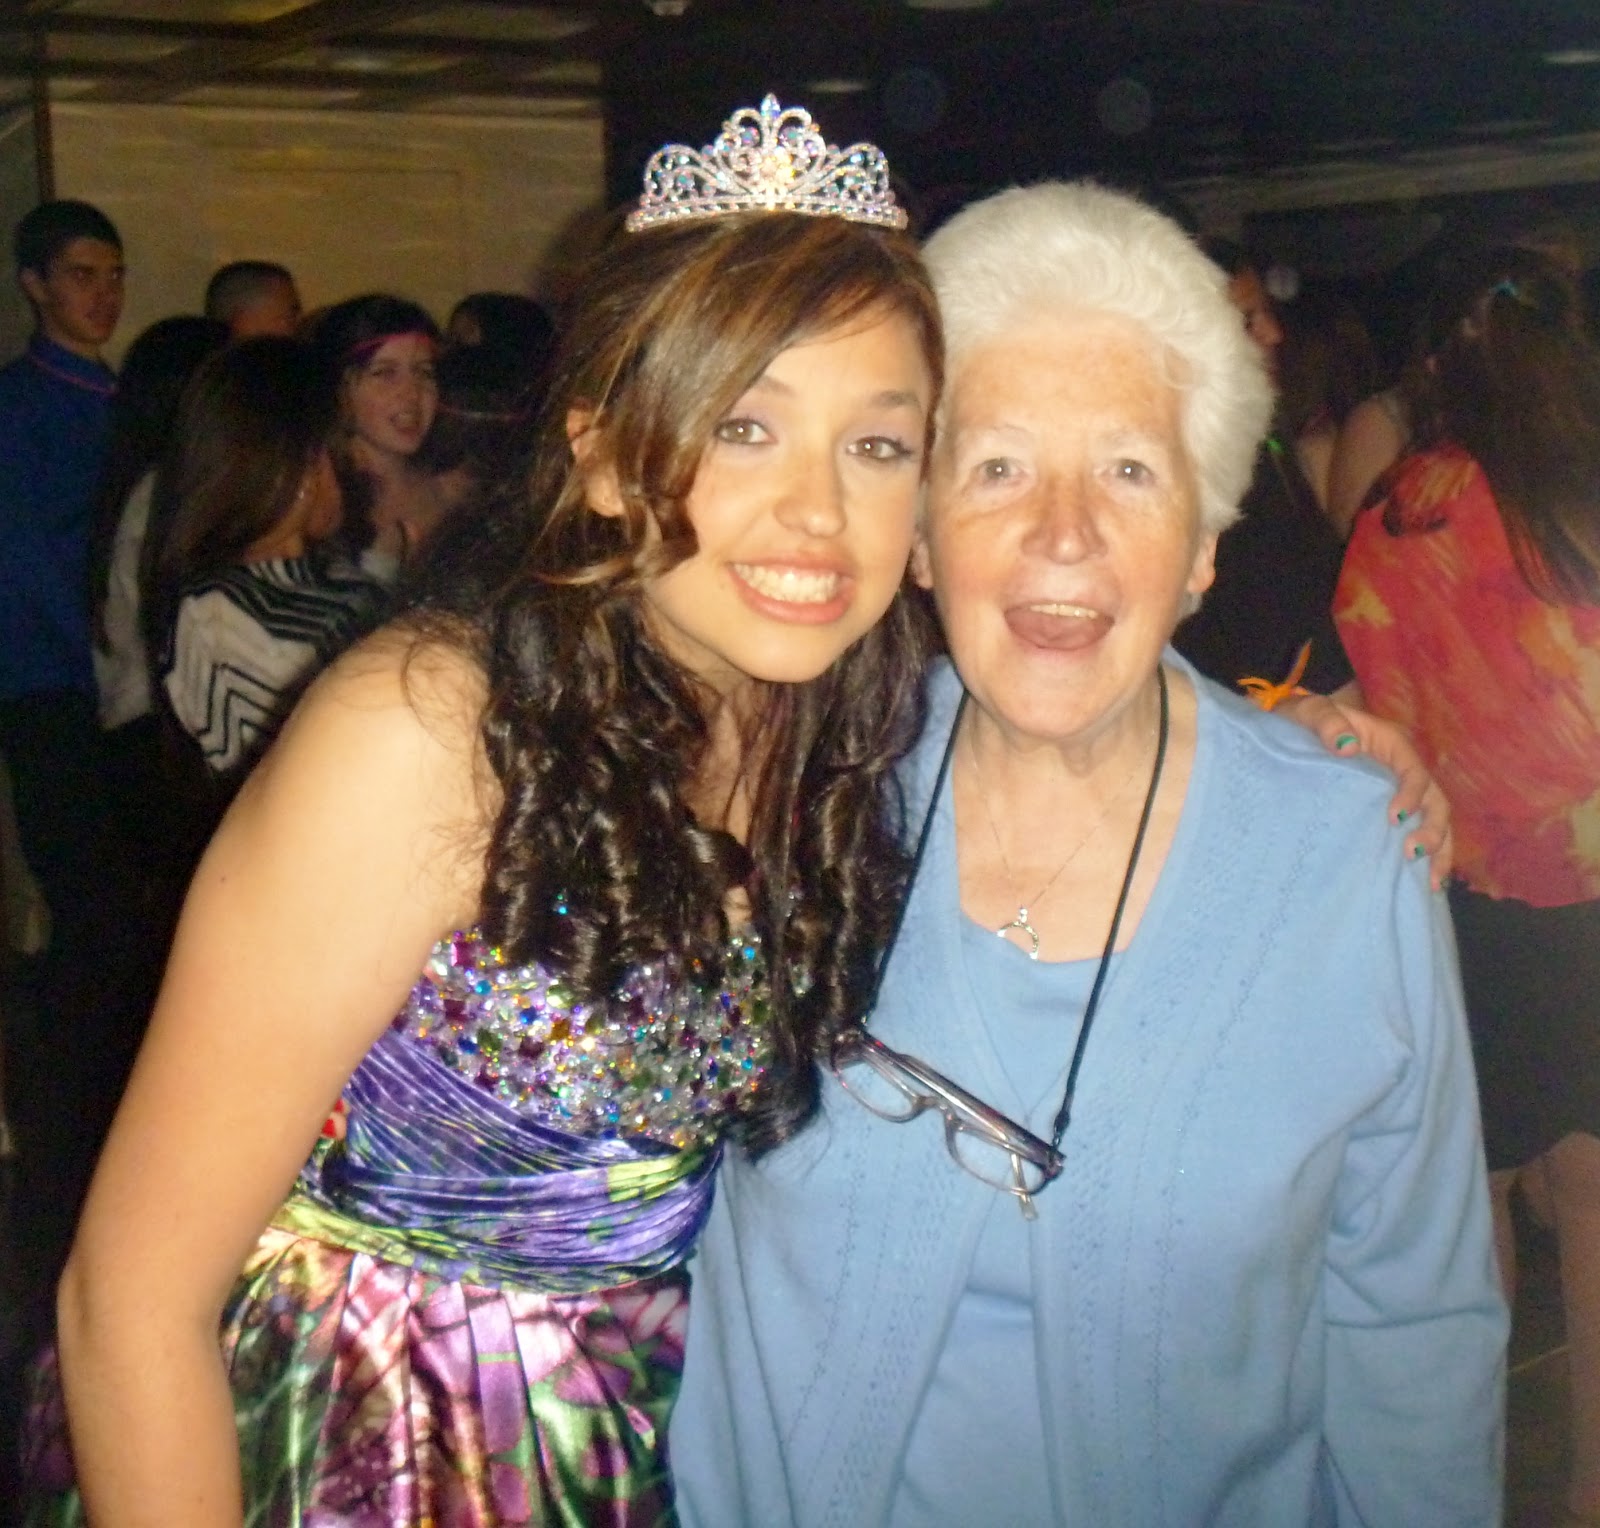
My mom passed away unexpectedly a little more then two months after my daughter's Sweet 16. They shared such a special bond and I am so grateful my mom was there with us to celebrate such a special occasion in my daughters life. 

Tuesday, January 10, 2012

David Wright Smash Book

I recently became obsessed with Smash books. I watched videos on Youtube of all the different hand-made creations and I decided that I wanted to make one. Since my daughter asked for David Wright stuff for Christmas I decided to make a David Wright Smash Book. 

I am thrilled, and so is she, at how this turned out, but I didn't think it would take so long to make. This project has to be one of the most detailed, and time consuming projects I have taken on. This post is very pic heavy.  

I made this book 7.75 x 10.25 with the inside pages measuring 7.25 x 9.75. I saw one of the K&Company Smash Books at Michaels and I liked the size so I made my book the same size.

This is the front cover. I covered the front and back covers with silver metallic paper over chipboard, and   the pictures of him on the front and back covers are from a calender I bought. 
This is the inside front cover and first page. I broke the book into 3 sections, and Wright This Way is the beginning of the 1st section.
Close up of the 1st page.
Pages 2 & 3...
Close up of page 2.
I made a pocket on this page and printed the wording, If you're not WRIGHT you're WRONG on vellum which I attached to the pocket with my Xyron. 
Close up of page 3.
I created this page in Excel, and the photo was taken by my daughter at a Mets game. 
Pages 4 & 5.
Close up of page 4.
I found printable graph paper online, and on top of that I printed some David Wright facts. I also cut the baseball out from a Cuttlebug die cut and embossed it.
Close up of the baseball.
I inked the lines of the embossed baseball with red ink, and I made the baseball flip open so I could hide some facts underneath it. 
Close up of page 5.
I created this in SCAL, welded it and cut it out on my Cricut. I used a white gel pen to embellish the letters. 
Close up of the crown.
It's hard to see but this was cut out of gold metallic paper. 
Pages 6 & 7...
Close up of page 6.
I designed this page after the sign you would see as you exited the #7 train at the Willets Point subway station when the Mets played at Shea Stadium. Now the sign says Mets Stadium. We have a lot of good memories of Shea Stadium so I wanted to throw this in there. I searched for a font that was similar to the font used in subway station signs, used SCAL and my Cricut.
Close up of page 7.
This page is a manila envelope. Inside the envelope is a piece of cardstock with 5 questions about David Wright. While searching the internet for things I could include in the book I came across a website called David Wright or Wrong. The website had a game you could play answering questions about him. I though it would be cute to include the questions and see how much my daughter really knew about him.
Pages 8 & 9...
close up of page 8.
This is the backside of the manila envelope with the flap open. I pulled the questions out a little bit just to take a photo.
close up of page 9.

I cut the baseball glove I used on this page using the Baseball Solutions cartridge and my Cricut. Again I made this so it would flip open and I could put a fact underneath. I inked the glove with Tim Holtz Distress Ink. Close up of the baseball glove.

Pages 10 & 11...
Close up of page 10.
I found printable lined paper online, and used the Cuttlebug baseball die cut again.
Close up of the baseball.
In between pages 10 & 11 I printed one of David Wright's Vitaminwater ads on vellum.
Close up of page 11
On this page, again I printed lined paper on card stock, and printed a fact over that. 
Pages 12, 13, 14, 15, 16 & 17
Close up of page 12.
This is another photo my daughter took at one of the games, and again I designed the paper on Excel and printed it on white cardstock.
I was trying to figure out a way to put baseball cards in this book. I search all over the internet and found these pages that hold 8 cards, 4 cards on one side, and 4 cards on the other side. They fit perfectly.
Page 13
Page 14
Page 15
Page 16
Close up of page 17
For the skyline I used the Plantin Schoolbook cartridge. I cut the skyline out with the image flipped and the shadow in orange cardstock and regular image in black cardstock.  
Page 18 & 19
Close up of page 18
I found this online, and printed it out on white cardstock.
Close up of page 19.
Movin Wright Along starts the 2nd section.
Pages 20 & 21
Close up of page 20.
I think this is my favorite page in the book. This page is the Mets Home Run Apple. The Home Run Apple came out of a magic hat, that was in the outfield, after every Mets home run at Shea Stadium. For the apple, hat and wording I used SCAL and cut it out on my Cricut. The Mets symbol in the center is an official sticker.
I made the hat flip open so I could hide a Wright fact in it. 
Close up of page 21.
Another photo taken by my daughter.
Pages 22 and 23
Close up of the baseball.
 
I between pages 22 and 23 is another David Wright Vitaminwater ad printed on vellum.
Close up of page 23 with another Wright fact.
Pages 24 & 25
Close up of page 24 with another fascinating fact.
In between page 24 & 25 is a small manila envelope that has the word rookie on it.
Close up of the manila envelope.
Inside the envelope is this fact.
Close up of page 25
I asked my daughter to write down words that she would use to describe David Wright. I used those words to create this Wordle page and I printed it on vellum.
Back of page 25 & page 26
Close up of page 26
I wanted to leave blank pages and spaces for my daughter to be able write things.
Pages 27, 28, 29, 30, 31 & 32
Close up of page 27
Another photograph taken by my daughter.
Page 28
Page 29
Page 30
Page 31
Close up of page 32
Again I used Plantin School Book for the skyline. I cut the skyline shadow in blue cardstock, and regular image in silver metallic cardstock.
Pages 33 & 34
Close up of page 33
I found this online, and printed it out on white cardstock.
Close up of page 34
Heading in the Wright Direction starts the 3rd and final section of the book.
Pages 35 & 36
Close up of page 35
I put a pocket on this page with the words Choose the Wright Path printed on vellum and I attached it to the pocket with my Xyron.
Close up of page 36
Another photo my daughter took.
Pages 37, 38, 39 & 40
Close up of the baseball on page 37
Close up of page 38
For this page I cut the number 5 on my Cricut using SCAL.
Close up of page 39 
It's another David Wright Vitaminwater ad printed on vellum.
Close up of page 40 with another fact.
Pages 41 & 42
Close up of page 41
Close up of the glove
 
In between pages 41 & 42 is another David Wright Vitaminwater ad printed on vellum.
Close up of page 42
This in Part 2 of David Wright or Wrong. This manila envelope contains 5 more multiple choice questions about David Wright.
Pages 43 & 44 
Close up of page 43
This is just the backside of the manila envelope with the flap open. I pulled the questions out of the envelope just to take a photo.
Close up of page 44 with another fact.
Close up of the baseball.
Pages 45, 46, 47, 48, 49 & 50
Close up of page 45
I have posted this pic before on my blog, but it's my daughters favorite picture so I had to include it.
Page 46
Page 47
Page 48
Page 49
Close up of page 50
Again I used Plantin School Book for the skyline. I cut the skyline shadow in black cardstock, and regular image in blue cardstock.
This is page 51, the last page and the back inside cover.
Close up of page 51.
I made a pocket on this page and printed the wording, Always do the WRIGHT thing on vellum which I attached to the pocket with my Xyron.
Close up of the inside back cover.
I bought this pen holder which has adhesive on it at the Container Store.
Close up of the back cover.
I punched and binded this book together with my Bind it All.